Story time
A little while ago, I had an idea for an activity that I wanted to setup and do with my five-year-old daughter, Charlotte.
Both her and her brother (2.5yo Jono) have always loved stories and we read a fair bit, so I thought it would be fun for us to create one (or several, because I intend for this to be re-used) of our own.
So, being laid low with the dreaded man-flu this week, I had a chance to make a move on it, while feeling sorry for myself on the couch.
What you’ll create
These are instructions to put together a fairly basic kids’ story.
You’re not writing War and Peace here. Not even Harry Potter.
However, this structure should allow you to have some fun with kids aged from about five to maybe 10 and a bit older.
It can extend to the higher age groups because, really, the story can become as complex as you want – the pen is in your hand!
Sharing is caring
Then I thought: ‘Why not digitise it (the actual storyboard is a physical board Charlotte and I will use together), write instructions and share it on the blog in case others wanted to use it?’
So, here we are.
One of the interesting comments I’ve got since we released The Adventurous Tale of Hilary Snail is people saying they’ve always wanted to write a children’s story, but never thought they could.
And that’s just not true.
Of course, some things come easier to some people, but with a few guiderails and instructions, anyone can at least have a go at anything.
Sure, I’m never going to be an AFL player, but I can play kick-to-kick with my kids and mates.
You (and I) might never be Dostoyevsky or Julia Donaldson, but we can still have a bit of fun.
Credit where it’s due
Just briefly, I want to credit where a lot of this comes from, because it’s not fair to make out like I’ve come up with it.
I’ve moulded it and adjusted it, but this ‘Kids Storyboard’ is based largely on Dan Wells’ seven-point story structure (dramatically cut down and simplified), while leaning on archetypal story analyses by psychology professor Jordan B Peterson.
Wells’ blueprint has been invaluable in the development of my current fiction novel project To Catch a Monkey and I would recommend viewing his videos to anyone interested in having a proper crack at writing.
Why you should teach your kids about stories
This is a ‘How To’ for a children’s storyboard, so I don’t want to go off on a tangent that I know will be long enough to be its own post … so I made it its own post.
Read ‘Why you should teach your kids about stories’ here.
If you get a sec (it’s not too long), then I’d encourage you to check it out, because, psychologically, people are more likely to act on something if they understand the ‘why’.
Ok, let’s do this.
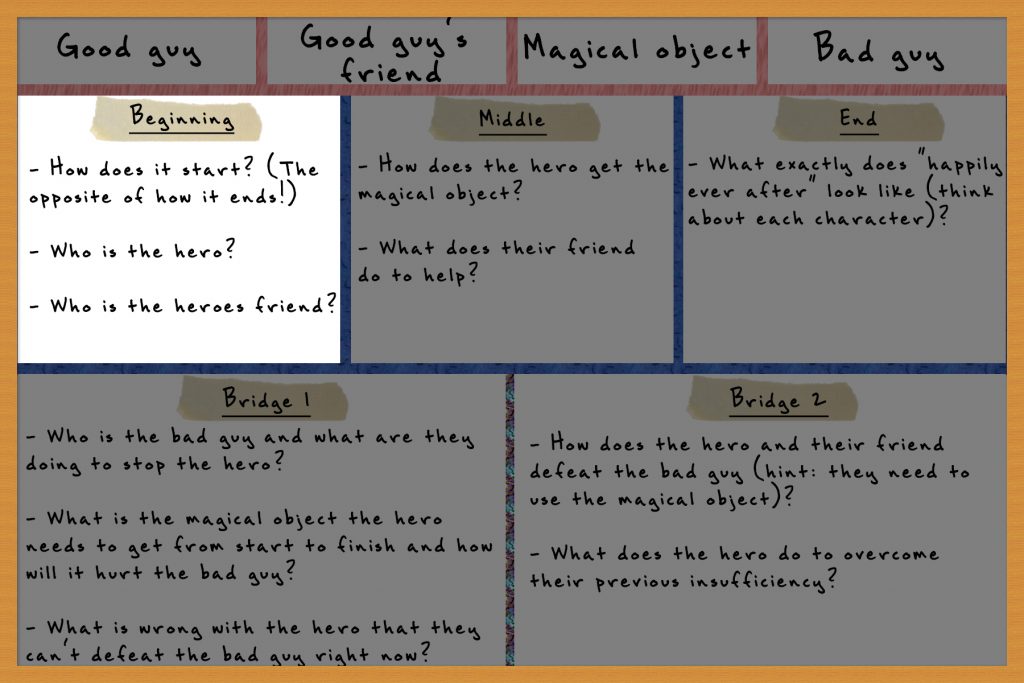
Children’s Storyboard
What you’ll need
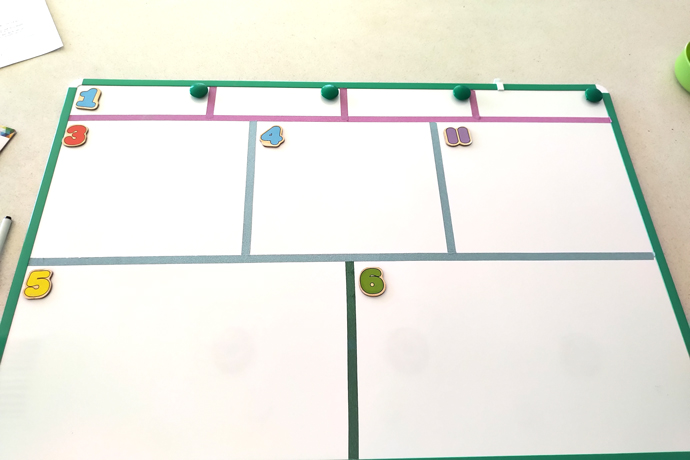
This is kind of up to you. If you want to replicate the one I made (that’s pictured at the top of this post), you’ll need:
- Large whiteboard (the one pictured is 900 x 600 from Officeworks)
- Some colourful tape (basically, anything you can use to divide sections)
- Whiteboard marker
- Pictures of things from your kids’ favourite stories (optional)
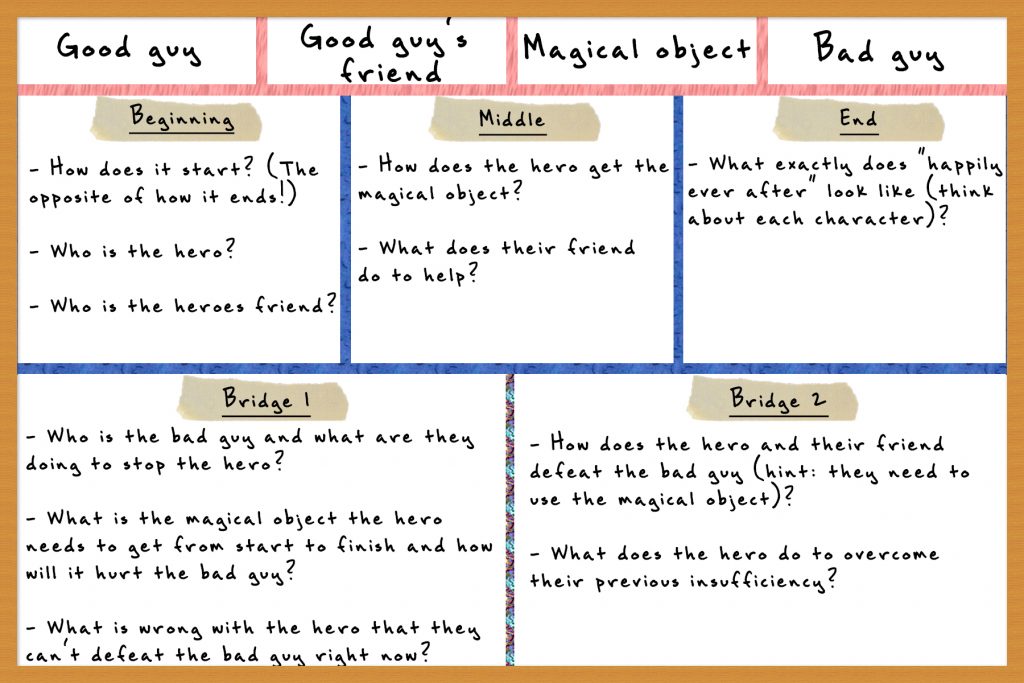
If you want to go all freestyle and do your own thing, basically you just want to recreate the digitised version above.
You need:
- A space for your four characters/objects
- A row of three boxes
- A row of two boxes.
IMPORTANT: I’d also recommend following the order of the steps (and don’t assume they’re in the order pictured on the board).
NB: Yeah, I know, I misspelt ‘hero’s’. And, yeah, I understand the irony, given this is a writing tutorial. Put it down to the man-flu. And, no, I’m not fixing it. Too much messing around, sorry.
How it works
I’ll take you through the steps and give you instructions and descriptions of each.
Under each Step (except Step 1), there’ll be “Questions to Answer”.
These are the questions you discuss with your child/co-author and your answers to those questions are what you write in the corresponding sections.
Step 1 – Define your characters
This is where you get the images of your children’s favourite story characters.
Get a pool of them – good and bad guys – as well as their faithful sidekicks and a bunch of magical objects and then you can pick a new one each time you write a new story.
As mentioned, this is optional, because you can either write a description of the characters (the good guy might be a heroic knight, or Wonder Woman, for example), or use random pictures.
This is especially the case with the “magical object”. You can really put anything in there. Witches turned your trusty household broom into a flying contraption; Aladdin turned your carpet into a vehicle.
These can be whatever you choose, but the important part is that you have them ready to go.
Every movie night at the moment, without fail, Jono and Charlotte will ask “is there are bad guy in this movie?”. I understand the question – the bad guy scares them and no-one likes to be scared (even those of you who enjoy horror movies; I’m not going to digress here, but you’re not ‘enjoying’ it, you’re taking part in a different psychological activity) – but the answer is always ‘yes’, because there’s always a bad guy.
Even in stories where the bad guy is the good guy (as in: a character flaw in the good guy). In Frozen, Hans isn’t really the bad guy. Sure, he’s bad, but overwhelmingly, the biggest threat to existence is Elsa’s lack of control over her power.
You might be questioning the headings, too – “Don’t I just need a good guy and a bad guy?” – but trust me: these structures are archetypal and we’ve been telling them for thousands of years.
Disney does the best job of following this structure. I’ll use Aladdin as an example (but be aware, my simplified version has, well, simplified things and it might not appear a perfect fit, because full-length stories use far more structures):
- Good guy: Aladdin
- Good guy’s friend: Abu the monkey (Disney usually always has the ‘good guy’s friend’ as an animal, which humans have traditionally associated with spirits)
- Magical object: Genie
- Bad guy: Jafar
As an interesting sidenote, the ‘good guy’s friend’ can be considered as the ‘spiritual guide’ in more complex stories. It’s Obi Wan Kenobi in Star Wars; Morpheus in The Matrix.
Step 2 – How does it end?
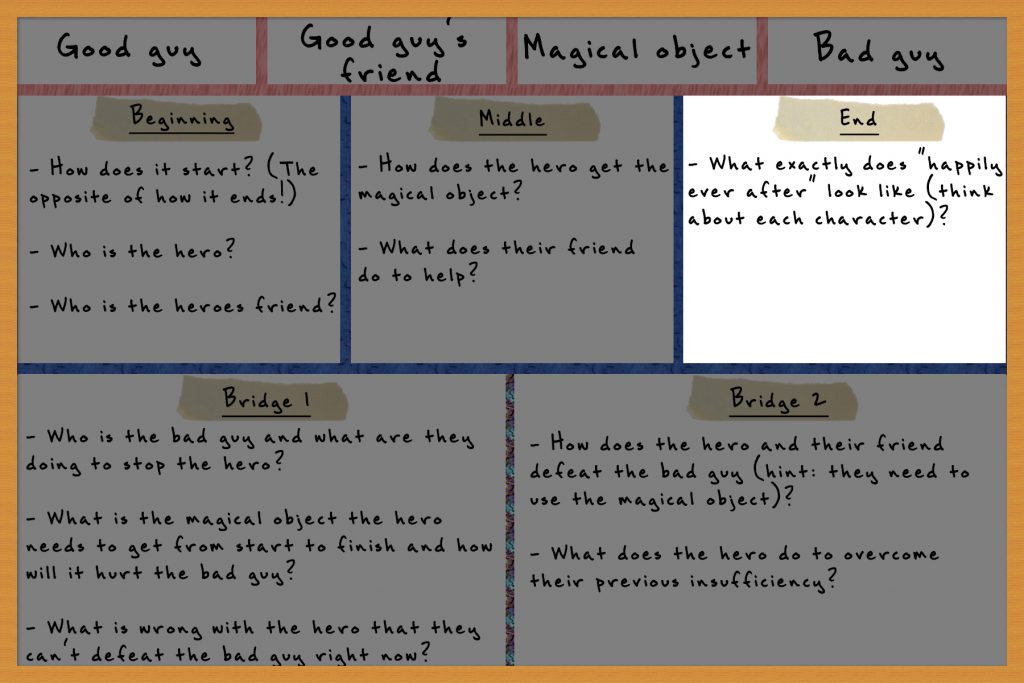
That’s right, we’re starting at the end.
Why?
Ever stood in front of a room that’s a total mess (most likely the room where your kids play and you’ll be doing this activity), wondering where on earth you even start to bring order to chaos?
Bingo. That’s why.
You’ve defined your characters, so now you define how they’re going to wind up.
Trust me: it makes things so much easier.
Questions to Answer:
- What exactly does “happily ever after” look like and mean (think about each character)?
Step 3 – How does it start?
If you and your budding Shakespear did your jobs well, you know precisely how this story ends.
Now?
Now you ‘flip the script’!
The beginning needs to be the exact opposite of the end. Frozen ends with Elsa and Ana friends and close family, with the castle gates open to all; therefore, it has to start with Elsa and Ana distant and isolated, with the castle gates closed.
Pick your favourite movie/story and this is the structure it follows (although, many will start with a Hook – some sort of action scene to grip you immediately – but that wouldn’t be such a simple storyboard).
Questions to Answer:
- How does it start/what is the opposite of the end?
- Who is the hero (give them some background)? (Hint: if they end up living happily ever after in a nice, safe castle, then they should probably either start out not living in the castle (Aladdin), or the castle they’re living in is not nice and safe (Frozen)).
- Who is the hero’s friend?
Step 4 – How do we cross the bridge?
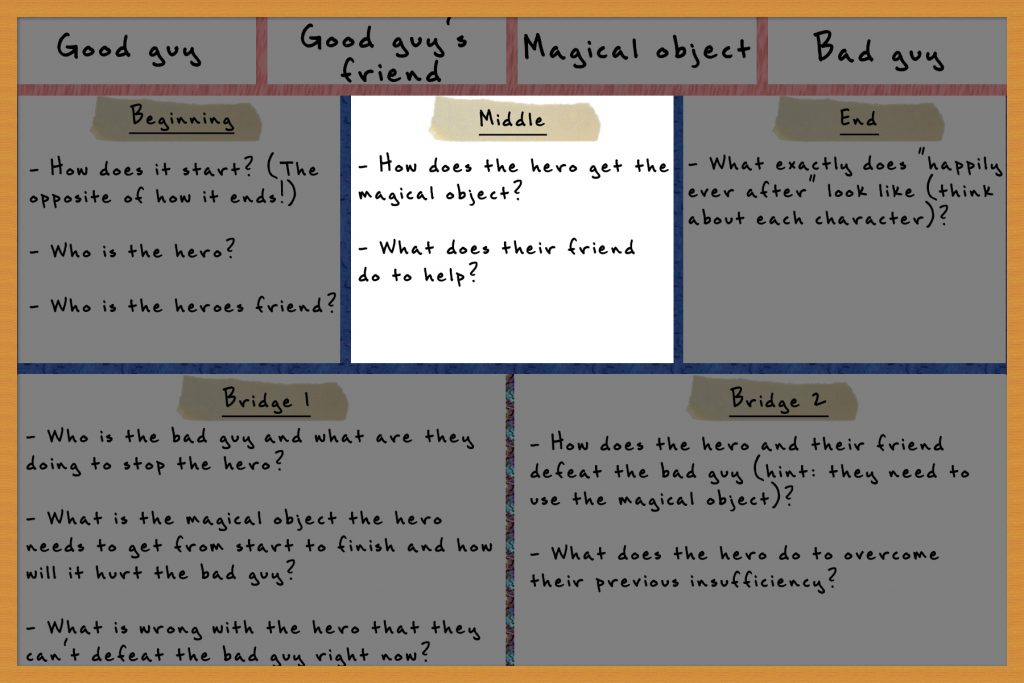
Ok, so, firstly: the bridge is a metaphor, representing the bridge from start to finish. You don’t need a bridge in your story.
Although, they are nice places under which to hide trolls.
The middle is your conflict scene and is nice and easy now you’ve defined the end and beginning.
All you have to do is bridge the gap.
To do that, your hero will need to use a magical object. That’s obvious, right? Because if they didn’t need the magical object, there wouldn’t be conflict or a story.
They’ll also need help from their friend – because that’s the way stories have always been told.
It’s Obi Wan (friend/spiritual guide) all creepily ghost-whispering in Luke’s ear to “use the force” (magical object), which enables the hero to go all pew-pew and blow up the Death Star.
Questions to Answer:
- How does the hero get the magical object?
- What does their friend do to help?
Step 5 – What’s stopping us from crossing the bridge?
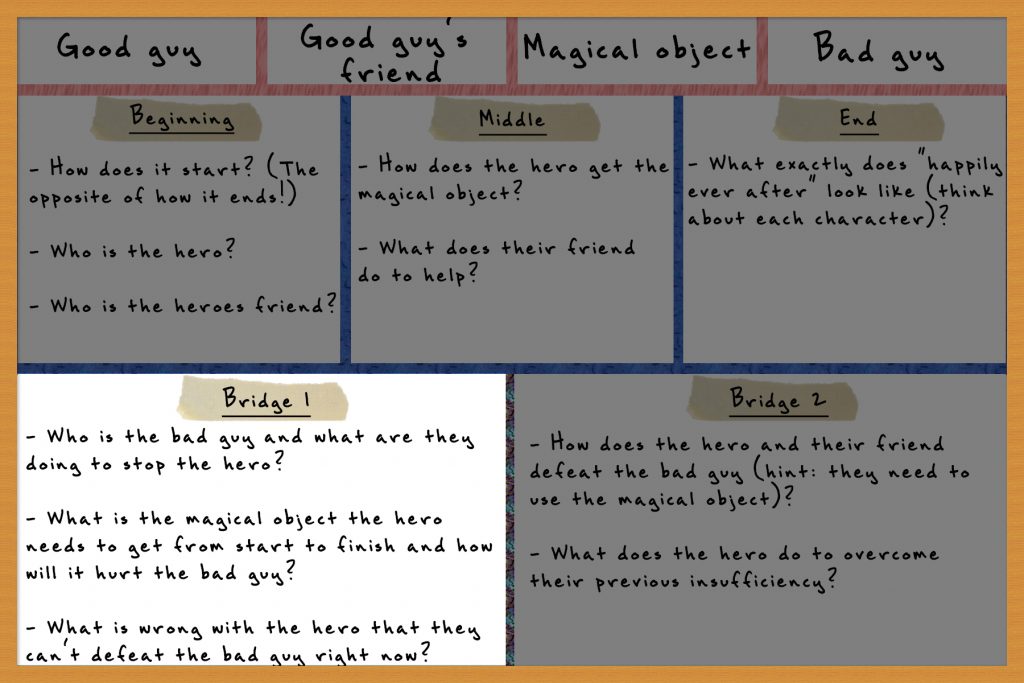
This is where we begin to fill in the blanks.
There’s obviously some holes in the story if we just look at our beginning, middle and end, so we need to begin to answer them.
Questions to Answer:
- Who is the bad guy and what are they doing to stop the hero?
- What is the magical object the hero needs to get from start to finish and how will it hurt the bad guy?
- What is wrong with the hero that they can’t defeat the bad guy right now? (Hint: this sounds like a complicated one, but it’s only as complicated as you want to make it, which is what I said about older age groups. Maybe the bad guy is big and muscly, but the hero is small and weak – there’s your rationale; you don’t need to make it any harder than that).
Step 6 – The crossing of the bridge
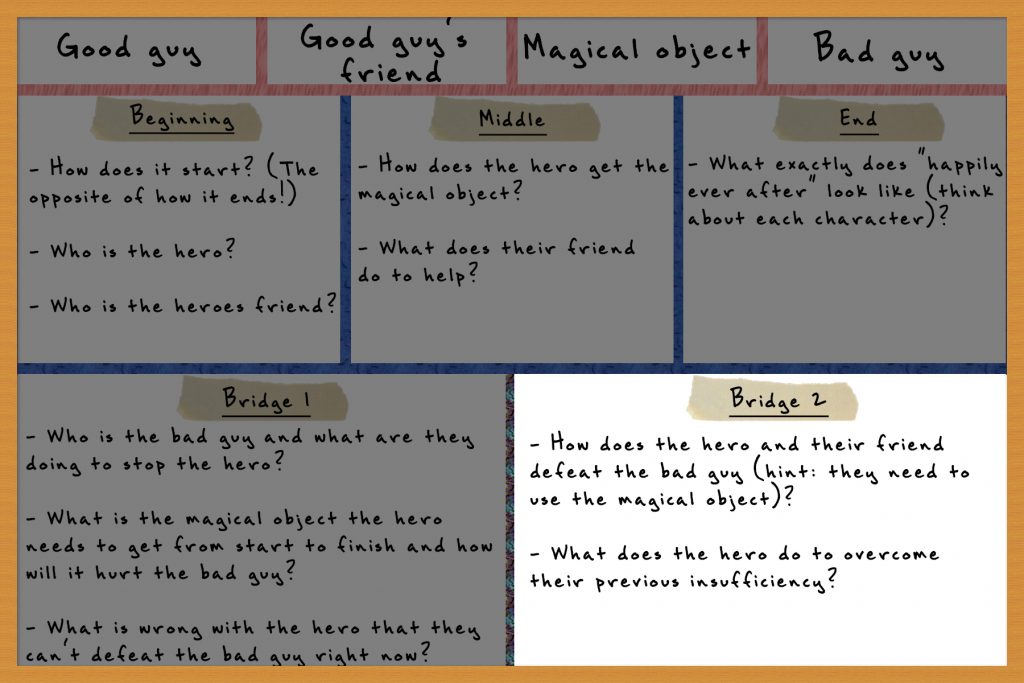
Ok, here’s where you resolve the conflict and lead into the ending.
You defined what the end looks like so you know where we’re going, you know who the bad guy is and how they’re stopping us from getting there, you know why the hero can’t defeat them, which is why they need the magical object and you know what it does and how it will hurt the bad guy, you know who the friend is and how they’ll help the hero.
All that’s left is to let the imagination run wild.
Questions to Answer:
- How does the hero and their friend defeat the bad guy? (Hint: They need to use the magical object).
- What does the hero do to overcome their previous insufficiency? (Hint: Using the example before, maybe to combat super strong, they became super smart and located a magical object, which they used on the bad guy once outsmarting them).
Step 7 – Get writing!
That’s it: all the hard work is done.
You likely now have a more complex story structure and outline than many of the books sitting in your child’s book hamper/shelf.
Now, the two of you sit down together and pull it together by looking back at what you’ve done.
The structure you bounce from to compile your narrative is as follows (using the labels in the digital image):
- Beginning
- Bridge 1
- Middle
- Bridge 2
- End
You can read out the notes you’ve jotted, pose some questions, and let your little inventor come up with the final links in the chain as you write it out.
Depending on the age group and interest, you could even handwrite it, putting each scene on a new page and leaving space on one side for your child to illustrate it.
Job done
Hopefully this works for you.
Regardless, if it doesn’t come together, hopefully it at least gives you and your child not only a nice memory and fun time together, but helps to teach them an invaluable skill.
It sure beats the hell out of plonking in front of a TV and watching someone else’s story, right?!
Dr Peterson said, that would be living out a tragedy without knowing it.
Take care,
GF